Imagine stepping into your backyard on a hot summer day and diving into your very own DIY plunge pool. These kits are designed for homeowners looking to create a refreshing escape without breaking the bank or hiring a professional. With a variety of styles and sizes available, plunge pools can fit any space, allowing you to enjoy the luxury of a pool in your own home.
Not only do DIY plunge pool kits offer a cost-effective solution, but they also provide a rewarding project for those who love hands-on work. From selecting the right materials to incorporating stunning outdoor enhancements, such as stone brick designs or spa integrations, you can tailor your plunge pool experience to perfectly match your lifestyle.
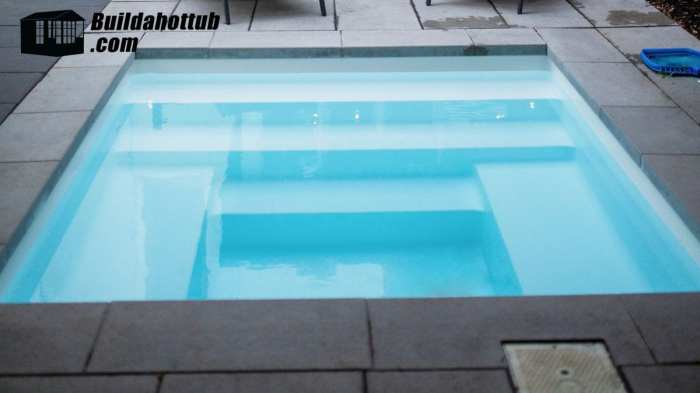
DIY Plunge Pool Kits Overview
DIY plunge pool kits offer an exciting and practical solution for homeowners looking to add a refreshing water feature to their outdoor spaces. These kits provide a cost-effective alternative to traditional pool installations, allowing homeowners to enjoy the benefits of a plunge pool without the hefty price tag or extensive construction time. With a variety of styles and customization options available, the allure of a DIY plunge pool has become increasingly popular among those seeking to enhance their backyards.When considering a plunge pool kit, it’s essential to understand the benefits and types available in the market.
DIY plunge pools typically require less space than standard swimming pools, making them ideal for smaller backyards or urban settings. They are designed for quick installation and can often be completed over a weekend, providing an instant retreat for relaxation and recreation. Furthermore, these plunge pools are usually more energy-efficient and require less maintenance than larger pools, which makes them an excellent choice for eco-conscious homeowners.
Types and Styles of Plunge Pools
Plunge pools come in various shapes, sizes, and materials that cater to different aesthetic preferences and functional needs. Understanding these options can help homeowners choose the best fit for their outdoor area. Here are some common types and styles:
- Fiberglass Plunge Pools: Known for their durability and ease of installation, fiberglass pools come pre-formed and can be placed directly into the ground. They are available in various colors and shapes, making customization straightforward.
- Vinyl Liner Pools: These pools feature a vinyl liner that is customizable and can be replaced when worn out. They typically come in a range of sizes and shapes, allowing for more flexibility in design.
- Concrete Plunge Pools: Concrete offers the most durability and customization options, as homeowners can tailor the shape and finish to their liking. However, they do require a longer installation process compared to fiberglass and vinyl pools.
- Above-Ground Plunge Pools: These portable options are easy to set up and can be relocated if necessary. They are often made from resin or metal frames and can be surrounded by decks for added appeal.
Key Features to Consider
Selecting a plunge pool kit involves evaluating various features that can enhance the overall experience and functionality. Here are some important aspects to consider:
- Size and Depth: Consider your space limitations and how deep you want your plunge pool to be. A smaller depth is suitable for soaking and relaxing, while deeper designs can accommodate more activities.
- Heating Options: Many plunge pools can be equipped with heating systems, allowing for year-round use. Look for energy-efficient options that maintain water temperature without excessive energy consumption.
- Filtration System: A quality filtration system is crucial for maintaining clean water. Choose a system that suits the size of your pool and offers easy maintenance.
- Accessories: Consider available accessories, such as built-in seating, jets for hydrotherapy, or lighting systems to enhance the ambiance.
DIY plunge pool kits provide homeowners with the opportunity to create a personal oasis, tailored to their preferences and lifestyle.
Tools and Equipment for Installation

When embarking on the journey of installing a DIY plunge pool kit, having the right tools and equipment is essential for a smooth and efficient process. This not only enhances the overall experience but also ensures that the installation is completed safely and correctly. Whether you are a seasoned DIY enthusiast or a first-timer, being equipped with the right gear will make a significant difference.The installation of a plunge pool involves various stages, from site preparation to assembly.
Each stage requires specific tools and equipment to facilitate the process. Below is a comprehensive list of the essentials you will need to gather before starting your project.
Essential Tools for Assembling a DIY Plunge Pool Kit
Having the right tools on hand can streamline the installation process. Below is a list of the essential tools required:
- Shovel: Necessary for digging the hole for the pool, especially if you’re going for an in-ground setup.
- Level: Ensures that the ground is perfectly flat and the pool is installed at the correct angle.
- Tape Measure: Used to measure the dimensions of the site and ensure proper fitting of the pool kit.
- Drill: Essential for fastening components together, particularly if the kit includes panels that need to be secured.
- Wrench Set: Required for tightening bolts and securing fittings that may come with the kit.
- Screwdriver Set: Useful for assembling any smaller parts and components that require screws.
- Safety Gear: This includes gloves, goggles, and steel-toed boots to ensure personal safety during installation.
Equipment Required for Successful Installation
In addition to basic tools, specific equipment can help ensure that the installation is both effective and safe. The following equipment is recommended:
- Excavator or Mini-Digger: For larger projects, this can significantly speed up the excavation process.
- Water Level: Ensures the pool is installed at the right height concerning surrounding areas.
- Vibrating Plate Compactor: Used to compact the base of the pool area for stability.
- Concrete Mixer: If your installation includes a concrete base, having a mixer will save time and effort.
- Hoses: For filling the pool once installed and ensuring proper drainage during construction.
Step-by-Step Guide to Preparing the Site for Installation
Proper site preparation is crucial for a successful plunge pool installation. Here’s a step-by-step guide to help you prepare your site effectively:
- Select the Location: Choose a level area away from trees and overhead power lines that can interfere with installation.
- Clear the Area: Use a shovel or excavator to remove any sod, rocks, or debris from the chosen site.
- Mark the Area: Use stakes and string to Artikel the dimensions of the pool, ensuring it matches the specifications of your kit.
- Excavate the Site: Dig down to the required depth according to your pool kit instructions, accounting for base material if needed.
- Compact the Base: Utilize a vibrating plate compactor to create a stable and flat base for your plunge pool.
- Check the Level: Use a water level or a laser level to ensure that the base is even and ready for installation.
- Install any Required Drainage: If necessary, set up drainage systems to prevent water accumulation around the pool.
Related Outdoor Enhancements
Enhancing your outdoor space around a DIY plunge pool can elevate both its aesthetic and functional appeal. By carefully considering elements such as stone brick design, storage solutions, integrated spas, yard maintenance equipment, and window selection, you can create a harmonious backyard oasis that complements your plunge pool experience.
Incorporation of Stone Brick in Pool Design
Stone brick can be an excellent choice for creating a beautiful and durable surround for your plunge pool. This material not only provides a natural and rustic charm but also offers excellent durability against weather elements.
- Patio Areas: Use stone bricks to create stylish patios or decks around the pool, which can serve as lounging areas.
- Retaining Walls: Consider building low stone brick walls to add dimension and separate different areas of your backyard.
- Steps and Pathways: Integrate stone bricks to design steps leading into the pool or pathways that guide guests around the outdoor space.
- Seating Features: Incorporate built-in stone brick seating to encourage relaxation and socializing around the plunge pool.
Storage Garages and Aesthetic Harmony
Storage garages that blend seamlessly with your backyard can enhance the overall appearance of your outdoor area while providing essential functionality. Choosing designs that harmonize with your plunge pool and landscaping is crucial.
- Matching Materials: Use similar materials, such as wood or stone brick, to create a cohesive look.
- Color Schemes: Select colors that complement the plunge pool and surrounding plants to create a unified aesthetic.
- Architectural Style: Choose a garage design that matches your home and pool style, whether modern, rustic, or traditional.
Integration of Spas with Plunge Pools
Combining a spa with your plunge pool can significantly enhance your relaxation experience. The soothing effects of a spa can complement the refreshing plunge pool for a versatile outdoor retreat.
- Proximity: Position the spa near the plunge pool for easy transition between the two water features.
- Shared Features: Consider installing shared decking to create a seamless flow from the plunge pool to the spa.
- Temperature Control: Ensure both the spa and plunge pool are equipped with heating options for year-round enjoyment.
Yard Equipment for Maintenance
Maintaining the area around your plunge pool requires specialized yard equipment to keep it looking pristine. The right tools will ensure the safety and longevity of your outdoor space.
- Pool Vacuum: Essential for keeping the plunge pool clean and free from debris.
- Lawn Mower: A reliable mower helps maintain the grass around the pool for a tidy appearance.
- Trimmers and Edgers: Use these tools to manage overgrown grass and define clear boundaries around your plunge pool area.
- Blower: A leaf blower can be useful for clearing debris from patios and walkways.
Considerations for Home Windows
Selecting the right home windows can create stunning views of your plunge pool while improving natural light and energy efficiency. It’s important to consider several factors when making this choice.
- Window Placement: Strategically position windows to maximize your view of the plunge pool from key indoor areas.
- Glass Type: Opt for energy-efficient, low-emissivity glass to reduce heat gain and maintain temperature.
- Style Compatibility: Choose window styles that match your home architecture and outdoor aesthetics for seamless integration.
- Maintenance: Select windows that are easy to clean, especially those facing the pool area.
Last Word
In conclusion, DIY plunge pool kits are an excellent way to add value and enjoyment to your property. By understanding the benefits, preparing for installation, and exploring various design options, you can create a splendid backyard oasis that will be the envy of friends and family. Dive into this project and make your home a refreshing retreat.
Frequently Asked Questions
What are the benefits of a DIY plunge pool kit?
DIY plunge pool kits provide cost savings, customization options, and the satisfaction of building your own pool.
How long does it take to install a DIY plunge pool?
Installation time varies, but typically it can take anywhere from a few days to a couple of weeks depending on the complexity of the kit and your experience level.
Do I need a permit for a DIY plunge pool?
Yes, it’s crucial to check your local regulations and obtain necessary permits before starting your plunge pool project.
Can I heat my plunge pool?
Absolutely! Many plunge pools can be equipped with heating systems to extend your swimming season.
What maintenance is required for a DIY plunge pool?
Regular maintenance includes cleaning, checking water chemistry, and inspecting the pool structure for any necessary repairs.


